
Hands-On History Activities
Printed Textiles

History
A Timeline of Printed Textiles
Around 1000 C.E.: Texts found in India mention printing and decorated textiles
1631: The British East India Company officially begins importing calicos to Europe from India
Late 1600s–mid 1700s: European textile producers in places like England, France, and Amsterdam experiment with producing their own printed textiles to meet a growing consumer demand. Legislation restricts their sale at home, so the American colonies become a major market for these fashionable and colorful fabrics which only the very wealthy could afford. These developments required a lot of research into the properties of different dyes and mordants for producing color on cotton vegetable fibers!
1770s: By the American Revolution, industrial and technological innovations mechanized the production of cotton textiles, making them more affordable. They became more of a “working and middle class” consumer good, leading to our association of calico as the clothes of 19th century pioneers.
1810: The growing of cotton in the American South also influenced the establishment of mills in New England towns, like Rehoboth. In 1810, a group of Rehoboth residents set up the Palmer River Manufacturing Company (later called the Orleans Mill), to turn raw cotton into cloth. The cloth produced in this mill was then sent to other nearby factories for printing.
1810: The Wilkinson Factory next to Slater Mill was established in present-day Pawtucket, Rhode Island. We know that machine calico printing took place in this mill!
Terms
Calico: This word has had slightly different meanings in different parts of the world. In the UK it referred to the weave of cotton cloth — an off-white, unbleached cloth with a plain weave, more durable than muslin. The word “calico” was derived from the English word for the region in India where this type of weave was produced. Because these fabrics were often decorated with repeating patterns (often floral), 19th century Americans used the word to mean any durable cotton fabric decorated with colorful repeating patterns.
Chintz: A repeating pattern decoration printed on textiles or pottery. In India, these were often floral or animal.
Mordant: A chemical that combines with a dye to help it hold fast to the cloth fibers even after washing. Certain mordants can also impact the shade of color produced. 17th and 18th century mordants included alum, tin, iron and copper.
Relief Printing: A method of printing in which a surface is carved so that the raised (or non-recessed) surfaces are inked and brought into contact with the paper or fabric.
Further Reading & Resources
- Stamp-making demonstration using relief-print carving and stamping methods
- 18th century calico designs at the Victoria & Albert Museum
- Portrait of a Woman in Silk: Hidden Histories of the British Atlantic World by Zara Anishanslin
- Simple Printmaking Techniques: a beginner’s guide to making relief prints with linoleum blocks, wood blocks, rubber stamps, found objects, & more by Gwen Diehn
- The Four Seasons of Mary Azarian by Lilias MacBean Hart
How to Design and Print on Fabric or Paper
Create your own design and print it on fabric or paper at home!
Materials
All of these can be purchased at most craft stores:
- Speedball or SafetyCut carving block (for wood block carving, use a block of pine or basswood instead)
- Lino-cutter carving tool (for wood block carving, use wood gouges instead)
- Water soluble block printing ink or an ink pad
- Small rubber brayer (paint roller)
- Leaves, flowers, or other items from nature that you want to experiment with!
- The paper or fabric you want to print (for fabric, cotton-based materials like muslin hold ink best)
Instructions
Step 1: Using pencil, draw your design on a piece of white scrap paper.
- Start simple!
- Remember, whatever you draw must fit the size of the block you will carve.
Step 2: Transfer your design to the block. For the rubber blocks, this can be done in two ways.
Option 1: Place your design face up on top of the rubber block and trace over it again with pencil (you may need to be heavy-handed with the pencil).
Option 2: Flip your design face down on the block, and, using the same pencil, make a pencil rubbing on the back of the scrap paper. With this second method, whatever you draw will be reversed once you transfer it onto the block. This is especially important if there are any words or letters in your design.
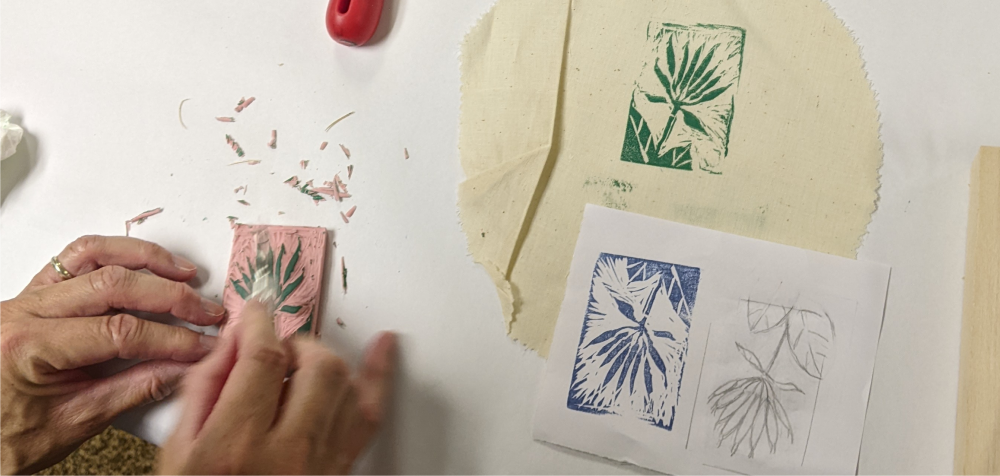
Step 3: Screw a narrow carving tip into your lino-cutter, and carefully carve out your design. Apply only light pressure and move the block continually so that your fingers remain behind the carving tool. There are two ways to approach the carving process:
- Simpler approach: Carve right over the outline of the pencil lines you drew. When you ink and stamp your block, your design will appear as white lines against a colored background.
- Relief carving approach: This is more similar to historical methods of textile printing. Using this method, you carve alongside the pencil lines you drew, leaving the lines untouched. Once you gently carve away the block on either side of your pencil lines, your original pencil lines will be raised, and will be printed once your block is inked and stamped. In the words of Cheryl, “it’s not what you take away, it’s what you leave, that matters.”
- Note: You may switch to a larger carving tip if you need to carve out large areas, but the narrower carving tip should serve for most purposes.
Step 4: Once your block is carved, it’s time to practice inking and printing.
- Printmaking is a process of trial and error, and you may not be satisfied the first time you stamp. That’s OK!
- The first couple of stamps will allow you to see places that you want to carve a little more, how much ink or paint you need, how much pressure to apply to the stamp, etc.
Step 5: Once you are satisfied with your block carving, carefully ink the rubber brayer so that the paint or stamp ink is evenly distributed.
Step 6: Roll the brayer across your carving to apply the ink.
Step 7: Carefully place your block face down on paper or fabric. Place a piece of scrap paper over your block and roll a clean brayer back and forth over the block to apply even pressure.
Step 8: Remove scrap paper and block from fabric carefully.
Step 9: Allow to dry completely.
Before washing, “heat set” your design into the fabric by placing a clean towel over your completely dry print and ironing.
Step 10: Wash your stamp and brayer with soap and water. You can use these again and again!

